
Happy Friday!
We are sure looking forward to the weekend around here. :)
We had a busy and very wet week in Texas. It has rained and rained and rained non stop, which has made
our week just a bit harder than normal. We are just not used to rain around here.
Anyway, before the weekend starts, I want to share a tutorial on how to make a free header for your blog using the website PicMonkey. For most of you this may be old news, but if you are technology challenged like me,
then this is good information. :)

Now, I am not very good at giving tutorials, so to make it really clear for you, I had to do a long post
with lots of pictures. You have been warned! LOL
Here we go.
First, open PicMonkey and click Design.


Click on Custom and manually enter the size you want your header to be.
Mine is 1325x490, so I entered those numbers and clicked Make it.


As soon as you do that, you will see this window.

Go over to the left side of the screen, click the little square for transparent canvas and hit Apply.
By doing this, when you upload the new header on your blog, you won't be able to see any seams
and it will blend perfectly.


You will know it worked when you see the little squares on your design window.

Now we are ready to start adding our pictures.
First, select the pictures that you want to use to decorate your header and save them on your desktop
( I find this is the easier way for me to find them)
Mouse over to the left side of your screen. Click on Overlays and a new screen will pop up.
Click on your own.


By doing this, it will take you to your desktop where you can click and choose the first picture you want to load.
I just choose three random pictures to show you how do this.


So now you have your first picture loaded into your design. You can change the size of it just by clicking and dragging. You can also move the picture around your design and place it where you like it.


You can repeat these steps as many times as you want and add as many pictures as you would like into your design.
For this tutorial, I uploaded three pictures using the steps above.


Now it is time to add your text.
Click the text tab on the left side of your screen.

Click Add Text and a small rectangular window will appear on your screen.
Just type in there the name of your blog or any other words you would like to appear on your header.
And by dragging the corner, you can make the words as big or small as you want.


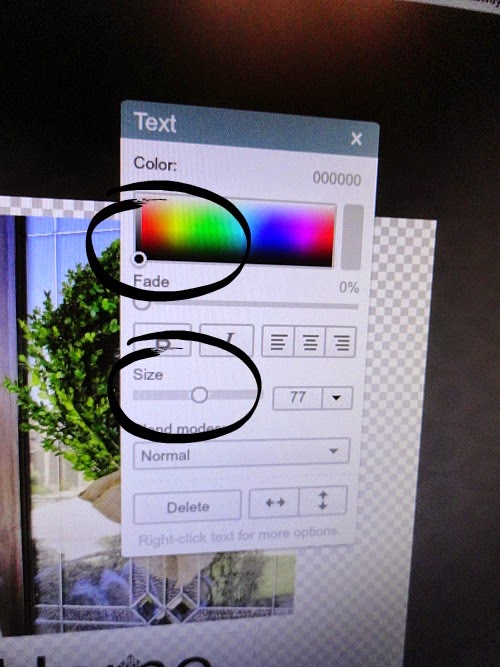
At this point, you can also choose the color and font you prefer.


When you have everything placed and you are happy with the design, just click save and save
the picture/header on your desktop.
You can also add to it some little seasonal overlays.
PicMonkey has really pretty ones and many to choose from.


And there it is!

Now you are ready to install it on your blog.
Go to your dashboard and click on Layout on the left hand corner of your screen.

When the new window pops up, clean Edit on your little header bar.

This new window will appear.

Click on Remove Image to delete your existing header, click on Upload a new Image, choose the picture
of the new header you have saved on your desktop and click Save.


And you are now the proud owner of a beautiful new header for your blog that will blend perfectly
into your background.
This is how I made the new Fall header I just applied to my blog a couple of weeks ago.

WOW! Are you tired yet? :)
I hope this tutorial helps someone out there make their blog prettier in a very easy way.
I wish you all have a super wonderful weekend.
Ours is going to be special. You see, we have theater tickets. YAY! It is going to be so much fun! :)
See you soon!
.png)
We are sure looking forward to the weekend around here. :)
We had a busy and very wet week in Texas. It has rained and rained and rained non stop, which has made
our week just a bit harder than normal. We are just not used to rain around here.
Anyway, before the weekend starts, I want to share a tutorial on how to make a free header for your blog using the website PicMonkey. For most of you this may be old news, but if you are technology challenged like me,
then this is good information. :)
Now, I am not very good at giving tutorials, so to make it really clear for you, I had to do a long post
with lots of pictures. You have been warned! LOL
Here we go.
First, open PicMonkey and click Design.
Click on Custom and manually enter the size you want your header to be.
Mine is 1325x490, so I entered those numbers and clicked Make it.
As soon as you do that, you will see this window.
Go over to the left side of the screen, click the little square for transparent canvas and hit Apply.
By doing this, when you upload the new header on your blog, you won't be able to see any seams
and it will blend perfectly.
You will know it worked when you see the little squares on your design window.
Now we are ready to start adding our pictures.
First, select the pictures that you want to use to decorate your header and save them on your desktop
( I find this is the easier way for me to find them)
Mouse over to the left side of your screen. Click on Overlays and a new screen will pop up.
Click on your own.
By doing this, it will take you to your desktop where you can click and choose the first picture you want to load.
I just choose three random pictures to show you how do this.
So now you have your first picture loaded into your design. You can change the size of it just by clicking and dragging. You can also move the picture around your design and place it where you like it.
You can repeat these steps as many times as you want and add as many pictures as you would like into your design.
For this tutorial, I uploaded three pictures using the steps above.
Now it is time to add your text.
Click the text tab on the left side of your screen.
Click Add Text and a small rectangular window will appear on your screen.
Just type in there the name of your blog or any other words you would like to appear on your header.
And by dragging the corner, you can make the words as big or small as you want.
At this point, you can also choose the color and font you prefer.
When you have everything placed and you are happy with the design, just click save and save
the picture/header on your desktop.
You can also add to it some little seasonal overlays.
PicMonkey has really pretty ones and many to choose from.
And there it is!
Now you are ready to install it on your blog.
Go to your dashboard and click on Layout on the left hand corner of your screen.
When the new window pops up, clean Edit on your little header bar.
This new window will appear.
Click on Remove Image to delete your existing header, click on Upload a new Image, choose the picture
of the new header you have saved on your desktop and click Save.
And you are now the proud owner of a beautiful new header for your blog that will blend perfectly
into your background.
This is how I made the new Fall header I just applied to my blog a couple of weeks ago.
WOW! Are you tired yet? :)
I hope this tutorial helps someone out there make their blog prettier in a very easy way.
I wish you all have a super wonderful weekend.
Ours is going to be special. You see, we have theater tickets. YAY! It is going to be so much fun! :)
See you soon!
You are the BEST at tutorials!!! I appreciate how you showed the exact screen shots we'd see along the way. You really explained everything well and I think I could totally do this based on your super tutorial! Thanks so much!!
ReplyDeleteGreat tutorial, Maria! Thank you!
ReplyDeleteWow! Such good instructions! I must admit - I am a bit "technologically challenged!" Have a wonderful week-end! xo
ReplyDeleteDid it!! THANK YOU, Maria Elena, for the amazing tutorial!!
ReplyDeleteHave a lovely weekend!
Poppy
P.S.:Love your new header!:))
You did a great job on the tutorial! It would still take me 9 hours to do this.... notice my header is text only. Maybe one day I'll add a photo. Or two.
ReplyDeleteWow....I needed this. You are my angel. I had been wanting to do a new header. Thanks for a detailed step by step. My kind of instructions...as I need lots of info.
ReplyDeleteSheila@mykentuckyliving
Good tips I have been using a couple different methods but your tutorial is much less complicated. Thanks for sharing!
ReplyDeleteGood tutorial! I'm going to try it. Sally
ReplyDeleteHow fun! I love broadway shows. Great features, Maria Elena....Christine
ReplyDeleteI cannot tell you how much I have wanted to create a header bar like this one. Thank you, thank you, thank you!!! I will be trying this out for a new header bar for the holidays coming up.... Candy
ReplyDelete